Wednesday, November 23, 2011

THANKSGIVING DECOR - BY THE SKIN OF MY TEETH!!!

I apologize for the lateness of this Thanksgiving-related post.  My intentions were great and I had time etched out for crafting, but the unexpected October 29th New England storm (Storm Alfred...I didn't even know it had a name until the power came back!) that left us without power for over a week and then no cable for a few days after ... not to mention the ensuing yard and home restoration that followed it, as well as the backlog at work, has put me way off my crafting game!!  Darn those Nor'easters!!


The snow we shovelled was up to my knees.  Tired!!  I don't know if you can see those poor trees in the background weighted by the snow!!  The oaks still had their leaves and the older ones simply didn't hold up to the weight of the snow.  Needless to say, I am keeping things simple this holiday. 

I completed my Fall wreath for the front door prior to the storm, thank goodness.


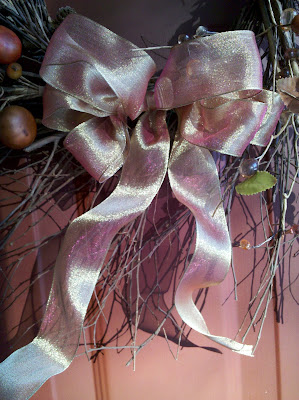
I started with a purchased twig wreath and some Fall foliage floral picks.  I placed the picks around the wreath in a way that pleased me and added a few dried weeds from my yard for texture.  I made my own bow using wire-edged ribbon that had a nice Fall ombre' to it.  I am particularly pleased about the bow because I am a Bow-Challenged Crafter (as much as I hate to admit it).


For a decorative touch in my powder room I placed some tiny pumpkins and a few berry sprigs in a tall vase and set it on the shelf. 


Here again I was lucky in that I set up the display initially for Halloween and when Halloween passed I simply removed the elements that were specific to that holiday (the spiders and skull...)


These tiny pumpkins are fun to use in your decor...you can find some additional uses in my post last year titled:  Quick Fall Table Decor Using Tiny Pumpkins.

I wanted something natural and homey for my Thanksgiving table.  I turned to Martha Stewart's Encyclopedia of Crafts book because I recalled seeing decor using acorns and leaves (and I have plenty of those!)


Sure enough,  the book has a section about "Acorn Crafts" that includes 4 projects: a pincushion; an acorn-topped box; a garland; and, a napkin ring.  I really would like to make the garland but, for the sake of time I settled on the simplicity of the napkin rings.  Each ring uses two acorns and one oak leaf.


Martha Stewart used real oak leaves and preserved them with a glycerin solution.  I did not have the time, nor the desire, to preserve my oak leaves so I stole some silk ones off of the fall garland I had on my mantel.

I collected some acorns with caps that fit (plenty of those lying around the yard now!)and used my Dremel tool fitted with my 1/16th" bit to drill two side-by-side holes through the top end of each cap.  I inserted 16" lengths of 22-gauge wire from the inside of the cap so the ends stuck towards the outside.


I twisted the wire ends and attached the acorn bodies to their wired caps with wood glue.


I wrapped the acorn stems with floral tape (... which is stiiiiicky!!!) .  I also used floral tape to attach one oak leaf  per napkin ring to a piece of 22-gauge wire (covering the wire as well.)  To use floral tape you need to stretch it as you tightly wrap the element.


Note:  I wondered why Martha used plain wire and then covered it, rather than pre-covered floral wire so I bought both types.  I found out that when the cloth-wrapped wire is pushed through the hole, the cloth part gets jammed up behind the hole which allowed only the wire to poke through.  You can see that in the photo below.


I do wish Martha would explain stuff like that.

The photo below, from left to right, shows the elements (and steps) that comprise one napkin ring:  a wrapped leaf stem; two wrapped acorn stems in opposing directions; the leaf stem attached to an acorn stem, then all wrapped together and covered with brown hem tape.


Martha's instructions guided me to wrap the wired elements with floral tape, and attach one leaf wire and one acorn wire together with brown floral tape, then wrap the units together with brown seam binding...gluing at the ends. I did my first one that way but found an order of steps that worked better for me on all the others when I was ready to apply the seam binding (which I could not find...so I used "Soft and Easy Hem Tape" and found that one package was good for two napkin rings.)

After wrapping each wired stem with floral tape this is the process I found to be most efficient: 

First:  Wrap a leaf stem with the hem tape...securing the end with a small wrap of floral tape.

Second:  Wrap an acorn stem with the hem tape...adding the leaf stem to the wrap when you get down an inch or so (which hides the ends of the leaf stem).  See photo below:


Third:  When you are a couple of inches from the bottom, add another acorn stem, positioning it so the acorn is heading in the opposite direction, and continue wrapping with the hem tape  until you reach the acorn.


Last:  At the acorn end, I wrapped the hem tape around a few times so hide any wire that showed and came back down the stem a little.  I used a bit of glue and held the end in place with a tiny clip until it dried.  I coiled the unit into a ring shape all ready to add a napkin.


These would also be pretty snaking up a candle stick, wrapped into a wreath, a vase, a chandelier -- the possibilities are something to think about.  But not right now!  Now I have to get everything else ready for my table...tomorrow!!! 


HAPPY THANKSGIVING EVERYONE!!!


Friday, October 28, 2011

A VARIETY OF PUMPKIN AND TREAT BAG IDEAS ON THE FLY!!

Halloween is practically upon us and I, for one, can not believe how quickly October has flown by!  I was hoping to publish one or two more posts before The Big Event but, given the time, will squeeze all that I have into this post.  And, if I can guarantee you the projects here are quick (even though the article will be long...)

First however, a note for the reader who requested, via a comment, more instruction for my "Sewn Harvest Pumpkins" post:  it has been updated to include a step by step tutorial.  An email was not provided so I have no other way to inform them that it has been completed.  To all other readers, if you ever have any questions regarding my projects, comments are great, but also feel free to email me at the address in my profile.  I read all emails and comments, love getting them, and try to respond as quickly as possible.  I thank all who have corresponded already! 


Here is a group shot of the Halloween 2011 dudes in this article.
Funny little guys.


So.  Here I go.  Halloween is Monday.  Already.  Wow.

Project One - Goofy Vampire Pumpkin:

As I have been looking through this year's Halloween books and magazines it appears that the big trend in pumpkins  is to decorate them rather than carve them.  It's as though all the editors got together and said, "forget carving this year, let's dress the pumpkins up instead!"  Some are decoupaged with fabric, tissue paper, or book pages (including mine from my last post); some are decked out with glued on embellishments such as rick rack and other trimming; some have been painted a solid color (white or black has been the norm) with a silhouetted image painted (or glued) on.

To be honest, I think we have Martha Stewart to thank for the development of pumpkin creativity.  She has been stepping up the innovative ideas for a while now and the pumpkins in her magazine this year (Martha Stewart Living, October 2011 issue) made me laugh outright and are again different from the mainstream.  She started with a couple of small pumpkins and on one, put zany eyeballs and a goofy smile, and decked the other out with vampire teeth and red map pins for eyes.  I combined the two and made my own goofy guy.


I printed the templates from Martha Stewart's website www.marthastewart.com/pumpkin-faces and, after laying the mouth template on the pumpkin, poked holes all along the outline into the pumpkin to transfer the design.


This lets you know where to cut.  For the eye holes, I cut cone-shaped holes, slightly smaller than what I was going to use for eyes.  As much as I enjoy Martha's creativity, I must admit that I find her instructions to often be vague and missing steps.  In this case, I was a little flummoxed as to how to go about reaching through the tiny mouth hole to scoop out the innards.  I used a long iced tea spoon but it wasn't easy.  Additionally, I am not really fond of scooping out pumpkin guts...


You can use store-bought eyeballs or you can make them.  Last year I made some from Styrofoam balls in my post titled: "Fall is Here - and With It Comes Halloween."  One of my readers made an anonymous comment offering an interesting suggestion: " FOR REALLY GOOD EYEBALLS, open up empty cans of Guinness Stout. The things that float and rattle inside and make it foam when poured look exactly like white eyeballs. All they need added are the pupils."  I decided to give it a try.  They were right!  I used colored Sharpie markers to draw in the features and a pair of eyeballs was born.


Thanks for the great idea Anonymous.  Good thing my husband likes Guinness Stout!

Project Two - Squash-kins:
I think the various magazine and book editors agreed not to discriminate against  the squash family since there is an abundance of decorated butternut squash, acorn squash, as well as other lesser known varieties of squash showing up .   Naturally I had to jump on that bandwagon as well.  I have seen many photos of  pumpkins and squash painted white and adding black silhouettes of ghost faces, lettering ("boo").  So I decided to make a white butternut squash ghost for this post to demonstrate the idea but when I flipped the squash over to paint the bottom and leave it to dry, I noticed that the shape was similar to another common Halloween standard - the skull - so I went with that idea. 


My skull came out somewhat less scary and more like a dude in aviator glasses, I think, but he goes well with my wacky "Martha Pumpkin".


While there are many resources that provide ideas for painting squash I initially inspired by the "Ghastly Ghosts" project in the book titled "Reader's Digest - The Ultimate Halloween Book," by Deborah Harding.


I like the variety of projects in this book and many of them are quick and easy.  My Cool Dude Butternut squash above just took a couple coats of white paint and some details applied with black paint.

Project Three - Black Cat Acorn Squash:

The author of that same book took the painted squash project one step further to include an acorn squash that was painted to look like a cat.  I was really running out of time but wanted to make the cat too.


The author cut shapes from paper, colored them individually and glued them onto a spray painted acorn squash (leaving the stem unpainted for the nose).  For the sake of time and my sanity I ran a google search for cat eye images, cut my selection out and glued them on to my painted squash.  I cut black construction paper for ears and cut a yellow anchor-shaped mouth from felt.  I cut several pieces of wire for the whiskers and simply poked them into the squash. 

Project Four - Broomstick Treat Bag:

Now, some people like to throw Halloween parties and put some treats in individual bags.  Here are a couple of ideas for "different" treat bags.  I found the first one in the Family Fun, October 2011 magazine issue. 


Making it is very simple.  Cut lengths of raffia and tie onto the end of stick stuck into a brown paper lunch bag filled with treats.

Project Five - Pumpkin Tag Treat Bag:


I traced around templates that I drew freehand onto paintchip cards to make the individual sections.


After I glued them together I added a small curlicue made from floral wire and a tiny stem.  I also used a brown marker to apply a little shading within the segments, smudging it with my finger before it dried to blur the line a bit.


Project Six - Fabric Treat Drawstring Bag:

This photo was from an earlier post that I did titled  "Drawstring Bags - One Technique, Many Uses" since it included a Halloween treat bag I thought I should include the photo here.  Instructions can be found in that article when you click on the title. 


HAPPY HALLOWEEN 2011 EVERYONE!!


Tuesday, October 18, 2011

EASY UPCYCLED PUMPKIN

  • Orange and green spray paint ... check. 
  • Floral wire ... check. 
  • Sticks, no problem...lots after Hurricane Irene ... check, check and, triple check! 
  • Glue gun ... check.  
  • Dryer vent hose ... check.  Wait, what?!?  Dryer vent hose you say?


What has all of this got to do with Fall crafting?  Well, put them together and you get the cutest and easiest little pumpkin ever, that's what.  Look at these!


This project caught my eye last year but I ran out of time to make it - the Fall decorating season was over and the Christmas crafting season had begun.  As usual, too many projects, too little time!!  Anyway, here I am a full year later and I actually remembered to give this a try (wonders never cease)!   I found the project in a book called The Big Green Book of Recycled Crafts, published by Leisure Arts.


To make one pumpkin you will need 20-25" of dryer vent hose - I bought some at my local hardware store since my husband frowned at the idea of my cutting into the vent hose attached to my dryer.  Go figure!    Measure the hose when it is extended fully and then cut.  Form it into a circle, matching the ends and glue to secure.  Tip:  I found that the longer length was better because I was more easily able to stretch it into the circle.  Another Tip:  I held the hose and glued it myself but it would be easier to maneuver if you had a helper to either hold the vent or apply the glue.  Yet another Tip:  I stretched a rubber band around it to secure the shape while the glue dried.

Spray the body orange and, when dry, spray a bit of green at the top.  (Spray a 6" long stick green while you are at it or, if you prefer you can leave the stick natural.)


Curl a 16" piece of wire around a pencil....


Slide pencil out...


And you have a completed curlicue!  Wrap the straight end around the base of the stick/stem.  Apply some glue to one end of the stick/stem and insert it into the opening in the center of the top of the pumpkin.


I made the "leaves" by knotting a 12" piece of ribbon at the base of the stem and trimming it into a leaf shape.


That's all there is to it!  When my husband came home from work he was surprised at how effective the pair of these pumpkins were.  He didn't even double-check to make sure our dryer hose was intact.

Crafty Tips:  If you hope to use these outside make sure you use a spray paint that is appropriate for outdoors.  Also, they are somewhat light and might blow away (can you imagine what someone might think if pumpkins were flying by them in the wind!! funny) so one thought I had would be to insert something weighty before you glue the ends together.

Wednesday, October 12, 2011

A LITERARY FALL LEAF WREATH AND PUMPKIN

This week I am not writing about a book per se, but about the pages in the book.  And I am not writing about the pages so much as I am writing about what can be done with those pages (once the book is no longer a viable reading option, says the librarian in me..)

I was wracking my brain for a different Fall wreath idea this year, thumbing through all those magazines and pre-holiday catalogues that had begun to pour, in when I noticed a recurrent theme:  leaves made from book pages, book pages with leaf shapes cut out of them and inserted into vases as table decor, pumpkins decoupaged with old book pages (hmmmm). 

I studied the pile of catalogues and magazines in my recycling bin.  I studied my book shelves and recognized several paperbacks that really were falling apart and waiting for me to accept their fate.  And an idea was born:   I decided to put them all to good use and created a Literary Fall Leaf Wreath!


Isn't is pretty?


To begin, I went through my catalogues and magazines looking mainly at the colors and tones, searching for areas that would make good Fall leaves.

Crafty Tip:  I used an old quilting trick taught to me by my sister who makes gorgeous quilts in her spare time.  When she is trying to visualize whether a fabric (or section of a fabric) will work for her finished piece she puts her right and left thumb tips together and her right and left index finger tips together to form an open triangular space in front of her.  If a smaller opening is required, she slides her hands closer together to make a smaller triangle.  She then holds this opening above the fabric so she can isolate the small section she might use while the her hands block out the rest of the image that may be visually distracting.  If she sees what she likes and feels it will "fit" the theme of her quilt, she buys it.  Easy-peasy!!


The photo above is an ad in one of my catalogues.


I use my hand triangle to block out visual distractions
 and determine that I like that section of color.
(Please excuse the visual distraction of the butterfly stamp on my hand ...
I went to a butterfly conservancy recently which was incredible!)


Ta da ... it is a beautiful Fall leaf!


I looked at everything on each page, the backgrounds as well as the image the photographer was trying to capture, isolating sections with my "hand triangle".


An ad for a blouse ...


... becomes a leaf!


Here's what I mean about looking beyond the picture itself.
If you look carefully you can see that I have traced my
 leaf template onto a section of the page
that might make an interesting leaf.


I do not own a leaf punch or a die-cutter so I made templates in the shapes of an oak leaf  and a maple leaf .  I cut two sizes of oak leaves from the magazines and catalogues and cut one size of maple leaves from the old paperbacks.  My fingers did get a little "scissor-sore" after a while.

Crafty Cutting Tip:   Make a rough cut first to separate the section you want from the larger piece of paper to reduce "drag" from weight of the sheet.  Next, when cutting around the shape, turn the paper rather than the scissors for a smooth, even cut.

I spread my leaves out in front of me, roughly sorted by color and tones and pinned a foundation layer of leaves around a foam wreath that I wrapped with burlap strips. 


I used leaves that were not my favorites for this foundation layer
 because I figured they would be mostly covered up anyway (as would the pins.)


I continued placing and pinning leaves randomly distributing the colors until the burlap was no longer visible and I was satisfied with the look.  I finished by placing the paperback book leaves around the entire wreath in a random fashion.


Crafty Tip:  I used some double-sided tape to keep some of the
leaves in place and to hide some of the pin heads.


Since I had some the paperback maple leaves left over I continued my literary holiday decor by using them to adorn a small pumpkin.  I had noticed some pumpkins in the magazines I was "leafing" through (bad pun but appropriate here!) that had been completely covered with dictionary pages and others that had tissue paper leaves decoupaged on them.  I combined the two ideas for my little pumpkin. 


I mixed some white all-purpose glue with a little water and decoupaged (fancy word for adding cutout adornments with layers of glue) them on using a small foam brush.   The spider is from one of my posts last year called: Fall Is Here - And With It Comes Halloween.   

Happy Fall crafting everyone!!


Wednesday, September 28, 2011

EASY TO SEW REUSABLE COFFEE SLEEVES FOR FALL

I stumbled upon a pattern for sewing coffee cup sleeves on the Fiskars website and decided to conclude National Sewing Month by making a pair in Fall-themed fabrics for my coffee loving colleagues.  The pattern was free on their website and was super simple to sew.  I really like the idea of a reusable sleeve because it cuts down on waste...just throw it in your laundry with the rest of your stuff when you need to.


You will need to collect two coordinating fabrics, some batting, a small piece of elastic cording, and a button (two if you want to make it reversible).  You will also need a sleeve from an earlier cup of coffee to use as a pattern.


Use the sleeve to create a template by drawing around it, then drawing another line about 1/2" out from its edge thereby making it a little larger all around for seam allowance.  (I have not yet drawn the larger outline in the above picture.)

Use your template to cut two pieces of fabric and one piece of batting.  I used my rotary cutter to cut the batting - scissors tend to snag.


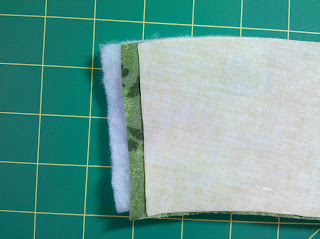
Layer your pieces in this order:  batting on the bottom, then lay one of the fabric pieces with the right-side up, then your other piece of fabric with the right-side down. 


You will want to lay your pieces so the edges line up nicely.  I splayed the pieces in the photo above so you could see the order.  Once they are lined up, cut a 5" piece of your elastic, fold it in half and lay it between the two fabric pieces with the cut edges hanging slightly outside your layers (loop end pointing towards the middle).


Pin the edges.


Sew a 1/4" seam around, back-stitching over elastic to secure and leaving an opening for turning the piece right-side out.


Trim your edges and clip your corners then turn it right-side out and hand stitch the opening closed.


 Top-stitch, using a 1/4" seam allowance.


Add a button.  I put buttons on both sides to make it reversible.


I made a second one for another colleague using different fabrics and style of buttons.


When we were all out together the other day, naturally we had to stop at my colleagues favorite coffee spot and when they came back to the car I gave them each their Fall Coffee Cup Sleeves.  They were so delighted they immediately put them on theirs cups (right over the cardboard sleeves if you look carefully!).  Cheers!


And now, I bid adieu to National Sewing Month 2011.  I draw in a deep breath and pat myself on the back -- I have braved my sewing machine one more time (anyone who knows me knows that I am not " at one" with my machine.)  The Machine and I have been associates since Middle School (waaaay back in the day) but have never mastered true friendship.  At best we maintain a distant wariness.  It's my fault really.  I have never truly tried to reach out to It.  It has always scared me with its mysterious elements.  But I must say, I think I might be close to asking It to come out and play more often.  Maybe get to know It a little better.  We'll see.