Showing posts with label Martha Stewart. Show all posts

Wednesday, November 23, 2011

THANKSGIVING DECOR - BY THE SKIN OF MY TEETH!!!

I apologize for the lateness of this Thanksgiving-related post.  My intentions were great and I had time etched out for crafting, but the unexpected October 29th New England storm (Storm Alfred...I didn't even know it had a name until the power came back!) that left us without power for over a week and then no cable for a few days after ... not to mention the ensuing yard and home restoration that followed it, as well as the backlog at work, has put me way off my crafting game!!  Darn those Nor'easters!!


The snow we shovelled was up to my knees.  Tired!!  I don't know if you can see those poor trees in the background weighted by the snow!!  The oaks still had their leaves and the older ones simply didn't hold up to the weight of the snow.  Needless to say, I am keeping things simple this holiday. 

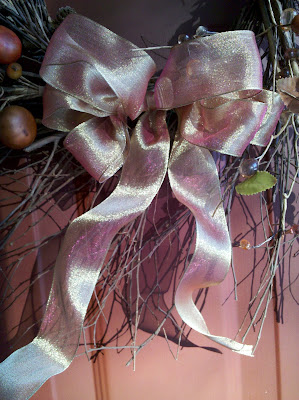
I completed my Fall wreath for the front door prior to the storm, thank goodness.


I started with a purchased twig wreath and some Fall foliage floral picks.  I placed the picks around the wreath in a way that pleased me and added a few dried weeds from my yard for texture.  I made my own bow using wire-edged ribbon that had a nice Fall ombre' to it.  I am particularly pleased about the bow because I am a Bow-Challenged Crafter (as much as I hate to admit it).


For a decorative touch in my powder room I placed some tiny pumpkins and a few berry sprigs in a tall vase and set it on the shelf. 


Here again I was lucky in that I set up the display initially for Halloween and when Halloween passed I simply removed the elements that were specific to that holiday (the spiders and skull...)


These tiny pumpkins are fun to use in your decor...you can find some additional uses in my post last year titled:  Quick Fall Table Decor Using Tiny Pumpkins.

I wanted something natural and homey for my Thanksgiving table.  I turned to Martha Stewart's Encyclopedia of Crafts book because I recalled seeing decor using acorns and leaves (and I have plenty of those!)


Sure enough,  the book has a section about "Acorn Crafts" that includes 4 projects: a pincushion; an acorn-topped box; a garland; and, a napkin ring.  I really would like to make the garland but, for the sake of time I settled on the simplicity of the napkin rings.  Each ring uses two acorns and one oak leaf.


Martha Stewart used real oak leaves and preserved them with a glycerin solution.  I did not have the time, nor the desire, to preserve my oak leaves so I stole some silk ones off of the fall garland I had on my mantel.

I collected some acorns with caps that fit (plenty of those lying around the yard now!)and used my Dremel tool fitted with my 1/16th" bit to drill two side-by-side holes through the top end of each cap.  I inserted 16" lengths of 22-gauge wire from the inside of the cap so the ends stuck towards the outside.


I twisted the wire ends and attached the acorn bodies to their wired caps with wood glue.


I wrapped the acorn stems with floral tape (... which is stiiiiicky!!!) .  I also used floral tape to attach one oak leaf  per napkin ring to a piece of 22-gauge wire (covering the wire as well.)  To use floral tape you need to stretch it as you tightly wrap the element.


Note:  I wondered why Martha used plain wire and then covered it, rather than pre-covered floral wire so I bought both types.  I found out that when the cloth-wrapped wire is pushed through the hole, the cloth part gets jammed up behind the hole which allowed only the wire to poke through.  You can see that in the photo below.


I do wish Martha would explain stuff like that.

The photo below, from left to right, shows the elements (and steps) that comprise one napkin ring:  a wrapped leaf stem; two wrapped acorn stems in opposing directions; the leaf stem attached to an acorn stem, then all wrapped together and covered with brown hem tape.


Martha's instructions guided me to wrap the wired elements with floral tape, and attach one leaf wire and one acorn wire together with brown floral tape, then wrap the units together with brown seam binding...gluing at the ends. I did my first one that way but found an order of steps that worked better for me on all the others when I was ready to apply the seam binding (which I could not find...so I used "Soft and Easy Hem Tape" and found that one package was good for two napkin rings.)

After wrapping each wired stem with floral tape this is the process I found to be most efficient: 

First:  Wrap a leaf stem with the hem tape...securing the end with a small wrap of floral tape.

Second:  Wrap an acorn stem with the hem tape...adding the leaf stem to the wrap when you get down an inch or so (which hides the ends of the leaf stem).  See photo below:


Third:  When you are a couple of inches from the bottom, add another acorn stem, positioning it so the acorn is heading in the opposite direction, and continue wrapping with the hem tape  until you reach the acorn.


Last:  At the acorn end, I wrapped the hem tape around a few times so hide any wire that showed and came back down the stem a little.  I used a bit of glue and held the end in place with a tiny clip until it dried.  I coiled the unit into a ring shape all ready to add a napkin.


These would also be pretty snaking up a candle stick, wrapped into a wreath, a vase, a chandelier -- the possibilities are something to think about.  But not right now!  Now I have to get everything else ready for my table...tomorrow!!! 


HAPPY THANKSGIVING EVERYONE!!!


Friday, October 28, 2011

A VARIETY OF PUMPKIN AND TREAT BAG IDEAS ON THE FLY!!

Halloween is practically upon us and I, for one, can not believe how quickly October has flown by!  I was hoping to publish one or two more posts before The Big Event but, given the time, will squeeze all that I have into this post.  And, if I can guarantee you the projects here are quick (even though the article will be long...)

First however, a note for the reader who requested, via a comment, more instruction for my "Sewn Harvest Pumpkins" post:  it has been updated to include a step by step tutorial.  An email was not provided so I have no other way to inform them that it has been completed.  To all other readers, if you ever have any questions regarding my projects, comments are great, but also feel free to email me at the address in my profile.  I read all emails and comments, love getting them, and try to respond as quickly as possible.  I thank all who have corresponded already! 


Here is a group shot of the Halloween 2011 dudes in this article.
Funny little guys.


So.  Here I go.  Halloween is Monday.  Already.  Wow.

Project One - Goofy Vampire Pumpkin:

As I have been looking through this year's Halloween books and magazines it appears that the big trend in pumpkins  is to decorate them rather than carve them.  It's as though all the editors got together and said, "forget carving this year, let's dress the pumpkins up instead!"  Some are decoupaged with fabric, tissue paper, or book pages (including mine from my last post); some are decked out with glued on embellishments such as rick rack and other trimming; some have been painted a solid color (white or black has been the norm) with a silhouetted image painted (or glued) on.

To be honest, I think we have Martha Stewart to thank for the development of pumpkin creativity.  She has been stepping up the innovative ideas for a while now and the pumpkins in her magazine this year (Martha Stewart Living, October 2011 issue) made me laugh outright and are again different from the mainstream.  She started with a couple of small pumpkins and on one, put zany eyeballs and a goofy smile, and decked the other out with vampire teeth and red map pins for eyes.  I combined the two and made my own goofy guy.


I printed the templates from Martha Stewart's website www.marthastewart.com/pumpkin-faces and, after laying the mouth template on the pumpkin, poked holes all along the outline into the pumpkin to transfer the design.


This lets you know where to cut.  For the eye holes, I cut cone-shaped holes, slightly smaller than what I was going to use for eyes.  As much as I enjoy Martha's creativity, I must admit that I find her instructions to often be vague and missing steps.  In this case, I was a little flummoxed as to how to go about reaching through the tiny mouth hole to scoop out the innards.  I used a long iced tea spoon but it wasn't easy.  Additionally, I am not really fond of scooping out pumpkin guts...


You can use store-bought eyeballs or you can make them.  Last year I made some from Styrofoam balls in my post titled: "Fall is Here - and With It Comes Halloween."  One of my readers made an anonymous comment offering an interesting suggestion: " FOR REALLY GOOD EYEBALLS, open up empty cans of Guinness Stout. The things that float and rattle inside and make it foam when poured look exactly like white eyeballs. All they need added are the pupils."  I decided to give it a try.  They were right!  I used colored Sharpie markers to draw in the features and a pair of eyeballs was born.


Thanks for the great idea Anonymous.  Good thing my husband likes Guinness Stout!

Project Two - Squash-kins:
I think the various magazine and book editors agreed not to discriminate against  the squash family since there is an abundance of decorated butternut squash, acorn squash, as well as other lesser known varieties of squash showing up .   Naturally I had to jump on that bandwagon as well.  I have seen many photos of  pumpkins and squash painted white and adding black silhouettes of ghost faces, lettering ("boo").  So I decided to make a white butternut squash ghost for this post to demonstrate the idea but when I flipped the squash over to paint the bottom and leave it to dry, I noticed that the shape was similar to another common Halloween standard - the skull - so I went with that idea. 


My skull came out somewhat less scary and more like a dude in aviator glasses, I think, but he goes well with my wacky "Martha Pumpkin".


While there are many resources that provide ideas for painting squash I initially inspired by the "Ghastly Ghosts" project in the book titled "Reader's Digest - The Ultimate Halloween Book," by Deborah Harding.


I like the variety of projects in this book and many of them are quick and easy.  My Cool Dude Butternut squash above just took a couple coats of white paint and some details applied with black paint.

Project Three - Black Cat Acorn Squash:

The author of that same book took the painted squash project one step further to include an acorn squash that was painted to look like a cat.  I was really running out of time but wanted to make the cat too.


The author cut shapes from paper, colored them individually and glued them onto a spray painted acorn squash (leaving the stem unpainted for the nose).  For the sake of time and my sanity I ran a google search for cat eye images, cut my selection out and glued them on to my painted squash.  I cut black construction paper for ears and cut a yellow anchor-shaped mouth from felt.  I cut several pieces of wire for the whiskers and simply poked them into the squash. 

Project Four - Broomstick Treat Bag:

Now, some people like to throw Halloween parties and put some treats in individual bags.  Here are a couple of ideas for "different" treat bags.  I found the first one in the Family Fun, October 2011 magazine issue. 


Making it is very simple.  Cut lengths of raffia and tie onto the end of stick stuck into a brown paper lunch bag filled with treats.

Project Five - Pumpkin Tag Treat Bag:


I traced around templates that I drew freehand onto paintchip cards to make the individual sections.


After I glued them together I added a small curlicue made from floral wire and a tiny stem.  I also used a brown marker to apply a little shading within the segments, smudging it with my finger before it dried to blur the line a bit.


Project Six - Fabric Treat Drawstring Bag:

This photo was from an earlier post that I did titled  "Drawstring Bags - One Technique, Many Uses" since it included a Halloween treat bag I thought I should include the photo here.  Instructions can be found in that article when you click on the title. 


HAPPY HALLOWEEN 2011 EVERYONE!!


Friday, October 1, 2010

A PATTERN IS LIKE A RECIPE

When you last heard from me I was heading off to our library shelves to research an idea I had for an easy starter sewing project for our resident cooking blogger, Julie (641.5 with Julie). As I researched and then executed this project I came to recognize similarities in our crafts: a pattern is much like a recipe! Both involve a collection of items, a series of steps and, if you follow the steps, a product to be proud of (or, in some cases, at least learn from...). If you read my last post you may recall that sewing is not my favorite craft in the world but I do like to cook.  This was therefore, a tremendously helpful epiphany.  Having said all that, here is my recipe for completing a sewn project from scratch.


My sewing machine.  Had it since I was a kid.  Hardly ever used. 
 I'm not sure the stitch selection wheel has ever been changed.
Here goes nothing!


Step One: Decide what you want to make.  This part was a no-brainer.  I decided that an apron would be a relatively easy item to execute and something that Julie might actually use.  It could also be a quick gift to make over a weekend for one of my cooking friends.

Step Two:  Locate a pattern.  Once I realized that I was going to have to produce this sewing project myself (egads!) I set out to find the simplest, most basic pattern possible. This is kind of like looking through cookbooks to find a recipe that suits you.

My initial search led me to 3 books that were not currently checked out. (Clicking on the titles will link you to our card catalogue should you want to place one on hold for yourself).


Seams to Me by Anna Maria Horner
The "Part 1 - Getting Started" section has good coverage of sewing tools and how to use them; the choices of fabrics and how to decide what you need; the how-to descriptions of basic stitches and the techniques one might encounter.
The "Part 2 - Projects" section includes an apron.


Weekend Sewing by Heather Ross
I figured anything that was labeled "weekend" had to be fairly manageable.  Indeed, her pattern for a tie around the waist style apron looked like it would be quick and easy.  It was a definite contender.


Martha Stewart's Encyclopedia of Sewing and Fabric Crafts by Martha Stewart
Even though this title was included in my last posting I thought I would revisit it with more of an in-depth look at how workable her projects are.  She has several apron options to choose from, some as simple as sewing two tea towels together.  I don't think I can get away with that here!


In the end I chose an apron pattern from Martha Stewart's book because it was a full length/chef style apron.  When I cook I get flour all over the place and frequently wash my hands that I dry on my apron.  A pretty, little half apron just doesn't cut it in my kitchen (I can't say what happens in Julie's kitchen...)!

Step Three:  Read the pattern instructions (and in my family, read it at least 3 more times because we're funny that way).  This is so you have a clear understanding of what the steps are and what you will need to purchase.

Step Four:  Shop!! Buy fabric and notions.  (Apparently "notions" doesn't just mean "ideas/whims" it also means "small useful items/sundries". One can have a notion to shop for notions!). At any rate, the pattern lists what you will need to complete the project.  This is probably my favorite step. But it can be daunting as well - so many choices, all ohhhh so pretty!  This is why many crafters often end up with vast "stashes" of fabric/yarns/flosses/patterns, etc. 

The pattern I chose suggested a medium weight fabric such as linen, cotton, denim.  Martha chose linen. Hmmm. I opted for durable denim because it can take lots of abuse (see above note about my cooking style).

You can learn a lot from the label on the end of the fabric bolt - including washing instructions.  It's a good idea to read this as I almost chose a fabric that said "dry clean only" - NOT very appropriate for an apron to say the least!  There is nothing on the label, however, that says "medium weight". Given Martha's examples I looked for denim type weights or something akin to a table cloth.  I steered away from the pretty quilt fabrics which are not medium weight.  When in doubt ask a store employee.


I had no idea there were so many denims to choose from. This display continued on the other side as well!


My notions have been collected and I am ready to go.

Step Five:  Prepare materials.  This is when a cook would start trimming the meat or washing the veggies.  A little less messy for a seamstress.

In the pattern I have chosen, Martha first recommends that you wash the fabric.  Why, I ask?  It looks pretty good to me.  I turn to her section "Preparing Fabric for Sewing" where she explains that washing "will prevent your finished project from shrinking in the wash after it's sewn and prevent puckering along seam lines."  Not necessarily a vital problem for my apron but probably a good habit to get used to (not that I intend to do a lot more machine sewing...) Since I am committed to this project I might as well do it right.  Who wants to cook in an apron with puckered seams after all? This same section of her book also instructs that you:

  • Press the fabric so the wrinkles don't "distort the fabric enough to throw off the sizes and shapes when it comes time to sew"

  • Find the grain (more kinship to cooking!) because the "grain of the woven fabrics influence both the drape and durability of a finished project

  • Determine the "right and wrong sides of fabric." Always a good idea. Guess you can't just flip it inside out... 
That Martha Stewart is thorough!!

Speaking of thorough, this book includes a CD with all the pattern templates on it, which is nice. But I decided not to print the template. The diagrams in the book show all the measurements I needed (famous last words).


My pieces all cut out.
I decided not to include a pocket and opted for it to be
shorter and slightly more narrow.

Note: remember when you are cutting out the 2 ties that the fabric is folded, ie. doubled. You only need to mark and cut each once. I almost ended up with 4 waist and 4 neck ties.

Step Six:  Create.  This is the time of truth.  The pieces are cut, there is no going back.  Commitment.  Deep sigh.   It is at this point that the cooking and sewing processes divide a little. Many cooks I know sip a little wine while they create.  Vast amounts of coffee however appears to accompany the creative process of most of the seamstresses I know. Hmmmm, again.

I look at the pieces, at The Machine and then to the pattern where I read (yes again but somehow it only enters my awareness now) that I can still avoid The Machine for a little bit because the next instruction requires ironing.  Now, to be honest here, what I feel towards ironing is akin to how I feel about machine sewing but I am at least a little more familiar with it.  So, off I run, pieces in hand, to the ironing board.  While the iron heats to the proper temperature for my fabric I read on (mm hmm, again - if I procrastinate long enough maybe the project will magically complete itself!).  I see why this instruction hadn't impinged itself on my awareness before:  Martha instructs "Sew double hems" but then follows it with an explanation of how to create a double hem (which requires folding in and pressing, then folding over and pressing again).


Martha's directions are complete and all terms that are unexplained within the pattern are easy to find in the other sections of her book when/if necessary - such as I did with "Preparing the fabric", or now, "edge-stitching" the double hem.  What?!


Edge-stitching means sewing very close to the inner edge of the hem.


My completed edge-stitch is a thing of beauty that I pause to admire.  I must admit there is a certain level of pride in this small accomplishment.


I can't be too smug however, because I did discover that you need to do this at a relatively slow and steady pace.  If you get too cocky and go too fast you just might go off the edge. 


My neck and waist ties all ironed and ready to edge-stitch.


All that is left to do is to attach the ties as instructed, using a "boxstitch" which is a fancy name for stitching what is essentially a square around the edges to secure the pieces together.  A figure to the side of the page depicts the step well.


My completed boxstitch.


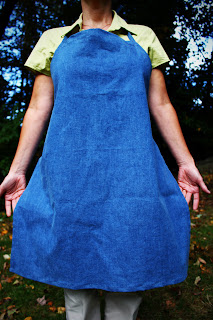
Ta Da!!! Project Apron complete!!


This wasn't so bad after all!  I even made some changes to the pattern (shorter, narrower, no pocket) and came out the other end with a viable product.  Not too shabby.  If you choose to do this as well, take note: you will need to buy less fabric - I ended up with a whole extra yard left over.  Another thought: for today's "green" movement recycle an old tablecloth instead of purchasing fabric.

I don't know if my apron would pass Martha Stewart's inspection but my seamstress friends showed appreciation as they inspected it and that works for me.  (A completed recipe would certainly taste better at this point but now I am prepared to cook anyway.  Guess I can put the coffee cup away and pick up the wine glass. Maybe I will try one of Julie's recipes.)

If I can do this, so can you.  Work the steps and let me know how you did.  Best wishes for happy sewing, The Crafty Librarian.