Showing posts with label Fall Wreath. Show all posts

Wednesday, November 23, 2011

THANKSGIVING DECOR - BY THE SKIN OF MY TEETH!!!

I apologize for the lateness of this Thanksgiving-related post.  My intentions were great and I had time etched out for crafting, but the unexpected October 29th New England storm (Storm Alfred...I didn't even know it had a name until the power came back!) that left us without power for over a week and then no cable for a few days after ... not to mention the ensuing yard and home restoration that followed it, as well as the backlog at work, has put me way off my crafting game!!  Darn those Nor'easters!!


The snow we shovelled was up to my knees.  Tired!!  I don't know if you can see those poor trees in the background weighted by the snow!!  The oaks still had their leaves and the older ones simply didn't hold up to the weight of the snow.  Needless to say, I am keeping things simple this holiday. 

I completed my Fall wreath for the front door prior to the storm, thank goodness.


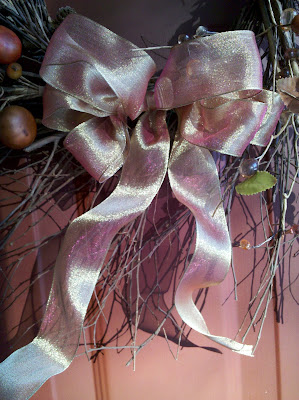
I started with a purchased twig wreath and some Fall foliage floral picks.  I placed the picks around the wreath in a way that pleased me and added a few dried weeds from my yard for texture.  I made my own bow using wire-edged ribbon that had a nice Fall ombre' to it.  I am particularly pleased about the bow because I am a Bow-Challenged Crafter (as much as I hate to admit it).


For a decorative touch in my powder room I placed some tiny pumpkins and a few berry sprigs in a tall vase and set it on the shelf. 


Here again I was lucky in that I set up the display initially for Halloween and when Halloween passed I simply removed the elements that were specific to that holiday (the spiders and skull...)


These tiny pumpkins are fun to use in your decor...you can find some additional uses in my post last year titled:  Quick Fall Table Decor Using Tiny Pumpkins.

I wanted something natural and homey for my Thanksgiving table.  I turned to Martha Stewart's Encyclopedia of Crafts book because I recalled seeing decor using acorns and leaves (and I have plenty of those!)


Sure enough,  the book has a section about "Acorn Crafts" that includes 4 projects: a pincushion; an acorn-topped box; a garland; and, a napkin ring.  I really would like to make the garland but, for the sake of time I settled on the simplicity of the napkin rings.  Each ring uses two acorns and one oak leaf.


Martha Stewart used real oak leaves and preserved them with a glycerin solution.  I did not have the time, nor the desire, to preserve my oak leaves so I stole some silk ones off of the fall garland I had on my mantel.

I collected some acorns with caps that fit (plenty of those lying around the yard now!)and used my Dremel tool fitted with my 1/16th" bit to drill two side-by-side holes through the top end of each cap.  I inserted 16" lengths of 22-gauge wire from the inside of the cap so the ends stuck towards the outside.


I twisted the wire ends and attached the acorn bodies to their wired caps with wood glue.


I wrapped the acorn stems with floral tape (... which is stiiiiicky!!!) .  I also used floral tape to attach one oak leaf  per napkin ring to a piece of 22-gauge wire (covering the wire as well.)  To use floral tape you need to stretch it as you tightly wrap the element.


Note:  I wondered why Martha used plain wire and then covered it, rather than pre-covered floral wire so I bought both types.  I found out that when the cloth-wrapped wire is pushed through the hole, the cloth part gets jammed up behind the hole which allowed only the wire to poke through.  You can see that in the photo below.


I do wish Martha would explain stuff like that.

The photo below, from left to right, shows the elements (and steps) that comprise one napkin ring:  a wrapped leaf stem; two wrapped acorn stems in opposing directions; the leaf stem attached to an acorn stem, then all wrapped together and covered with brown hem tape.


Martha's instructions guided me to wrap the wired elements with floral tape, and attach one leaf wire and one acorn wire together with brown floral tape, then wrap the units together with brown seam binding...gluing at the ends. I did my first one that way but found an order of steps that worked better for me on all the others when I was ready to apply the seam binding (which I could not find...so I used "Soft and Easy Hem Tape" and found that one package was good for two napkin rings.)

After wrapping each wired stem with floral tape this is the process I found to be most efficient: 

First:  Wrap a leaf stem with the hem tape...securing the end with a small wrap of floral tape.

Second:  Wrap an acorn stem with the hem tape...adding the leaf stem to the wrap when you get down an inch or so (which hides the ends of the leaf stem).  See photo below:


Third:  When you are a couple of inches from the bottom, add another acorn stem, positioning it so the acorn is heading in the opposite direction, and continue wrapping with the hem tape  until you reach the acorn.


Last:  At the acorn end, I wrapped the hem tape around a few times so hide any wire that showed and came back down the stem a little.  I used a bit of glue and held the end in place with a tiny clip until it dried.  I coiled the unit into a ring shape all ready to add a napkin.


These would also be pretty snaking up a candle stick, wrapped into a wreath, a vase, a chandelier -- the possibilities are something to think about.  But not right now!  Now I have to get everything else ready for my table...tomorrow!!! 


HAPPY THANKSGIVING EVERYONE!!!


Wednesday, October 12, 2011

A LITERARY FALL LEAF WREATH AND PUMPKIN

This week I am not writing about a book per se, but about the pages in the book.  And I am not writing about the pages so much as I am writing about what can be done with those pages (once the book is no longer a viable reading option, says the librarian in me..)

I was wracking my brain for a different Fall wreath idea this year, thumbing through all those magazines and pre-holiday catalogues that had begun to pour, in when I noticed a recurrent theme:  leaves made from book pages, book pages with leaf shapes cut out of them and inserted into vases as table decor, pumpkins decoupaged with old book pages (hmmmm). 

I studied the pile of catalogues and magazines in my recycling bin.  I studied my book shelves and recognized several paperbacks that really were falling apart and waiting for me to accept their fate.  And an idea was born:   I decided to put them all to good use and created a Literary Fall Leaf Wreath!


Isn't is pretty?


To begin, I went through my catalogues and magazines looking mainly at the colors and tones, searching for areas that would make good Fall leaves.

Crafty Tip:  I used an old quilting trick taught to me by my sister who makes gorgeous quilts in her spare time.  When she is trying to visualize whether a fabric (or section of a fabric) will work for her finished piece she puts her right and left thumb tips together and her right and left index finger tips together to form an open triangular space in front of her.  If a smaller opening is required, she slides her hands closer together to make a smaller triangle.  She then holds this opening above the fabric so she can isolate the small section she might use while the her hands block out the rest of the image that may be visually distracting.  If she sees what she likes and feels it will "fit" the theme of her quilt, she buys it.  Easy-peasy!!


The photo above is an ad in one of my catalogues.


I use my hand triangle to block out visual distractions
 and determine that I like that section of color.
(Please excuse the visual distraction of the butterfly stamp on my hand ...
I went to a butterfly conservancy recently which was incredible!)


Ta da ... it is a beautiful Fall leaf!


I looked at everything on each page, the backgrounds as well as the image the photographer was trying to capture, isolating sections with my "hand triangle".


An ad for a blouse ...


... becomes a leaf!


Here's what I mean about looking beyond the picture itself.
If you look carefully you can see that I have traced my
 leaf template onto a section of the page
that might make an interesting leaf.


I do not own a leaf punch or a die-cutter so I made templates in the shapes of an oak leaf  and a maple leaf .  I cut two sizes of oak leaves from the magazines and catalogues and cut one size of maple leaves from the old paperbacks.  My fingers did get a little "scissor-sore" after a while.

Crafty Cutting Tip:   Make a rough cut first to separate the section you want from the larger piece of paper to reduce "drag" from weight of the sheet.  Next, when cutting around the shape, turn the paper rather than the scissors for a smooth, even cut.

I spread my leaves out in front of me, roughly sorted by color and tones and pinned a foundation layer of leaves around a foam wreath that I wrapped with burlap strips. 


I used leaves that were not my favorites for this foundation layer
 because I figured they would be mostly covered up anyway (as would the pins.)


I continued placing and pinning leaves randomly distributing the colors until the burlap was no longer visible and I was satisfied with the look.  I finished by placing the paperback book leaves around the entire wreath in a random fashion.


Crafty Tip:  I used some double-sided tape to keep some of the
leaves in place and to hide some of the pin heads.


Since I had some the paperback maple leaves left over I continued my literary holiday decor by using them to adorn a small pumpkin.  I had noticed some pumpkins in the magazines I was "leafing" through (bad pun but appropriate here!) that had been completely covered with dictionary pages and others that had tissue paper leaves decoupaged on them.  I combined the two ideas for my little pumpkin. 


I mixed some white all-purpose glue with a little water and decoupaged (fancy word for adding cutout adornments with layers of glue) them on using a small foam brush.   The spider is from one of my posts last year called: Fall Is Here - And With It Comes Halloween.   

Happy Fall crafting everyone!!


Monday, November 22, 2010

FROM MY READERS/TO MY READERS

This post is in response to some emails that I have received from several readers.  I must say, it is so nice to hear from you and I really appreciate your input and comments.  Keep them coming.

One of my readers sent me a photograph of a whimsical wreath she made after reading my "Fall Wreath" post.  She has given me permission to share it with the rest of you.


I love how she used her imagination by putting the fairies and chair on it.  She really thought outside the box!  It goes to show that you can use anything, there are no rules when crafting.  I thank her for sharing.  If anyone else has photos of projects they have made after reading my blog and would like to share them  I would love to see them.  My email is in the "Complete Profile" section.

Also, I would like to thank those of you who expressed sympathy in regards to the passing of my Aunt, which I shared in my post about the local Needlework Exhibits.  I appreciate your thoughtful responses very much.  I still haven't gotten to any of those exhibits...have any of you?  If yes, I would love to here about which one(s) and what your impressions were.

Additionally, the library now has a copy of the  book published by The Connecticut Historical Society that relates to the exhibition in Hartford: 


 Connecticut needlework : women, art, and family, 1740-1840 

This book offers comprehensive research of many 18th and 19th century needle work pieces by Connecticut women.  Beautifully photographed, it shows the stitches employed, the designs and artistry of their work. 

Please click on the title above to connect to our library catalogue record and to place a hold on it if you so desire.


Again, thank you for your thoughts, comments, photos and best wishes -- keep them coming!

F.Y.I.:  over the next few weeks I aim to post frequent articles that address quick gifts to create during the upcoming Holiday season. Keep checking in!

Wednesday, October 27, 2010

A FALL WREATH TO GREET YOUR GUESTS

I love the Fall.  I love the vibrant colors of the leaves, the textures of all the grasses and seed pods, and the cool, but not yet cold, air – so crisp and clean with the occasional scent of wood fires wafting through.  Particularly the cool air this year after all the heat and humidity we experienced.  This is a great season for hiking.


Photo courtesy of dgartistics


While wracking my brain for this post I needed to get out and enjoy what was becoming a beautiful Fall day, the first after several days of rain during which my husband and I had not been able to continue our pursuit of exploring the local bike trails two miles or so at a time.  The wind and rain had knocked a lot of the branches and leaves down so we had to keep an eye on where we were stepping more than usual. I began to take note of several fairly large leaves from different types of trees and I started to think of ways I could use them, perhaps as templates for a felt leaf runner or some painted project. The creative juices were beginning to flow again. Ahhhh.

Back at work the next day I began pouring through our Christmas books (hoping I could find a Christmas craft that I might translate into a Fall project). Luckily for me, my brain was now on Craftster overdrive from my hike when I picked up a new arrival:
 wreaths and bouquets cover 300 x 300 from amazon

As I flipped through the book my mind started to buzz with ideas: Wreaths. Centerpieces. Fall foliage. Company coming. Decor. Ahhh again! A little light bulb went on in my head. I usually think of wreaths as a Christmas decoration, but Paula Pryke’s book provides ideas and inspirations for arrangements for every season and many types of occasions. And while the book is titled 'Wreaths and Bouquets', the author provides ideas for other ways to incorporate fresh and dried plant materials in the home as well. Additionally, the author sprinkles bits of how-to’s and tips throughout. I skip to her section “The Fall,” hoping for some ideas, and am immediately drawn in by the colors and textures I see - some expected, others not.  They sing of the Fall.  The photography in the book by Sarah Cuttle is excellent. While I don’t care for all the arrangements exhibited I am fueled with ideas from many and eager to find some materials to begin a project. 

I already had an old grapevine wreath stashed in my attic: an imagined project-to-be that never was.  You see, unfortunately, the fine art of arranging plant materials is another craft that I am not particularly skilled in. My mother has a wonderful gift for creating clever, artistic arrangements. I do not. The extent of my ability has been to plop the whole bunch of flowers into a vase and pray they drape artfully. Sometimes a hopeful little nudge will create…something. (I fear you are going to begin to doubt the “Crafty” part of the blog title!! Fear not, I would never send you down any rabbit hole that I was not willing to fall into myself.)

So now, inspired by Paula Pryke’s book, and with my grapevine wreath dusted off, I return to our library shelves hoping to find something more exactingly instructional such as “put flower A into slot A and flower B, etc.”  Floral crafting is not an exact art, however.  None-the-less I find another book that will help guide my current endeavor:


Malcolm Hillier’s books never seem to disappoint me as they are thorough and contain beautiful photographs.  This one is a good combination of the principals of arranging, what choices the arranger has, and inspirational ideas.  It covers both fresh and dried flowers with a multitude of photographs of plant material options by season as well as occasion.  It goes beyond wreaths and bouquets providing ideas for a variety of floral crafts such as garlands and ropes, flower pressing, potpourri as well as the tools and techniques (with diagrams) you might encounter.

Emboldened by all that I have read I am ready to find plant materials for my project.  I will be seeking a variety of types of plants with different textures, shapes and colors so I plan to exit the bike trails and search the woods and marsh areas.

If you want to try this and are not sure where to go, you might want to look into the annual Wreath Ramble at the Hill-Stead Museum in Farmington. This is a popular yearly event (this year it is on November 14 from 12 – 4 pm) during which, for a small fee, participants can stroll the Museum's grounds collecting materials like bittersweet, milkweed pods, ferns  and berries.  Then, with guidance from  expert volunteers who have the supplies needed, you can create your own wreath.  Click here, or on the museum’s name for more information.

Unfortunately, I could not wait for this year's Ramble so I approached my husband with the idea of looking for wreath making materials. One of the things I love about my husband is his enthusiasm.  He may greet the statement, “Let’s go off the trails and look for plants for a wreath!” with a blank stare, but he is always game for a walk in the woods.  And while he may not know what bittersweet or milkweed pods look like, or what I mean by “frothy spray type stuff, pods and plants that have texture,” when given an example or two he always rises to the challenge and is a great searcher.  In fact, I  am quickly in awe of his ability to spot a particular type of berry or plant waaayyy before I do and in no time at all we have a beautiful collection of plant materials to work with.  This was actually a very nice way to spend the afternoon together on a beautiful Fall day.

 Some of the materials we collected
(Please be reminded that it is important not to collect materials from privately owned property unless you have secured permission.)

Note: bring clippers, gloves and paper bags.  Also, collect more than you think you will need because some will get crushed in transit and some may not be “right” for the arrangement.


You will want to spray the more delicate pieces with ozone-friendly hairspray or some other fixative (outdoors if possible) to discourage any disintegration.


I wove bittersweet vines in and around the grapevine base, using a glue gun to secure them as needed (I sometimes adhered leaves or loose berries to exposed glue to cover it).


I randomly placed the rest of my materials through trial and error in a way that pleased me – alternately moving a piece around until it looked “right” and gluing it in place (make sure you like where you have it before you glue it).


I made pine cone “flowers” that I arranged here and there:
 

Here's how I made the pine cone flowers:


I snipped sections from the pine cone using my pruning shears.


I was able to make several flowers from each pine cone.


This is a close-up of one section.


Finally, I attached an old bird’s nest that I salvaged from a bush in my yard.  I knew the nest was no longer in use and had been abandoned (never remove a nest from the wild that may still be inhabited or is in the process of being made). I also added a bird that I purchased from my local craft store.


And here is my completed wreath!


I encourage you to give this project a try, materials are prevalent right now and best of all, free! It is a beautiful season to forage for elements to use and rambling around the outdoors with your spouse, child, best friend, what-have-you is a great way to spend time together. 

Little end note: If you are interested in visiting the Hill-stead Museum during any other part of the year you might be interested in reserving our library’s Museum Pass which is provided by the Friends of the Avon Free Public Library.