Wednesday, October 27, 2010

A FALL WREATH TO GREET YOUR GUESTS

I love the Fall.  I love the vibrant colors of the leaves, the textures of all the grasses and seed pods, and the cool, but not yet cold, air – so crisp and clean with the occasional scent of wood fires wafting through.  Particularly the cool air this year after all the heat and humidity we experienced.  This is a great season for hiking.


Photo courtesy of dgartistics


While wracking my brain for this post I needed to get out and enjoy what was becoming a beautiful Fall day, the first after several days of rain during which my husband and I had not been able to continue our pursuit of exploring the local bike trails two miles or so at a time.  The wind and rain had knocked a lot of the branches and leaves down so we had to keep an eye on where we were stepping more than usual. I began to take note of several fairly large leaves from different types of trees and I started to think of ways I could use them, perhaps as templates for a felt leaf runner or some painted project. The creative juices were beginning to flow again. Ahhhh.

Back at work the next day I began pouring through our Christmas books (hoping I could find a Christmas craft that I might translate into a Fall project). Luckily for me, my brain was now on Craftster overdrive from my hike when I picked up a new arrival:
 wreaths and bouquets cover 300 x 300 from amazon

As I flipped through the book my mind started to buzz with ideas: Wreaths. Centerpieces. Fall foliage. Company coming. Decor. Ahhh again! A little light bulb went on in my head. I usually think of wreaths as a Christmas decoration, but Paula Pryke’s book provides ideas and inspirations for arrangements for every season and many types of occasions. And while the book is titled 'Wreaths and Bouquets', the author provides ideas for other ways to incorporate fresh and dried plant materials in the home as well. Additionally, the author sprinkles bits of how-to’s and tips throughout. I skip to her section “The Fall,” hoping for some ideas, and am immediately drawn in by the colors and textures I see - some expected, others not.  They sing of the Fall.  The photography in the book by Sarah Cuttle is excellent. While I don’t care for all the arrangements exhibited I am fueled with ideas from many and eager to find some materials to begin a project. 

I already had an old grapevine wreath stashed in my attic: an imagined project-to-be that never was.  You see, unfortunately, the fine art of arranging plant materials is another craft that I am not particularly skilled in. My mother has a wonderful gift for creating clever, artistic arrangements. I do not. The extent of my ability has been to plop the whole bunch of flowers into a vase and pray they drape artfully. Sometimes a hopeful little nudge will create…something. (I fear you are going to begin to doubt the “Crafty” part of the blog title!! Fear not, I would never send you down any rabbit hole that I was not willing to fall into myself.)

So now, inspired by Paula Pryke’s book, and with my grapevine wreath dusted off, I return to our library shelves hoping to find something more exactingly instructional such as “put flower A into slot A and flower B, etc.”  Floral crafting is not an exact art, however.  None-the-less I find another book that will help guide my current endeavor:


Malcolm Hillier’s books never seem to disappoint me as they are thorough and contain beautiful photographs.  This one is a good combination of the principals of arranging, what choices the arranger has, and inspirational ideas.  It covers both fresh and dried flowers with a multitude of photographs of plant material options by season as well as occasion.  It goes beyond wreaths and bouquets providing ideas for a variety of floral crafts such as garlands and ropes, flower pressing, potpourri as well as the tools and techniques (with diagrams) you might encounter.

Emboldened by all that I have read I am ready to find plant materials for my project.  I will be seeking a variety of types of plants with different textures, shapes and colors so I plan to exit the bike trails and search the woods and marsh areas.

If you want to try this and are not sure where to go, you might want to look into the annual Wreath Ramble at the Hill-Stead Museum in Farmington. This is a popular yearly event (this year it is on November 14 from 12 – 4 pm) during which, for a small fee, participants can stroll the Museum's grounds collecting materials like bittersweet, milkweed pods, ferns  and berries.  Then, with guidance from  expert volunteers who have the supplies needed, you can create your own wreath.  Click here, or on the museum’s name for more information.

Unfortunately, I could not wait for this year's Ramble so I approached my husband with the idea of looking for wreath making materials. One of the things I love about my husband is his enthusiasm.  He may greet the statement, “Let’s go off the trails and look for plants for a wreath!” with a blank stare, but he is always game for a walk in the woods.  And while he may not know what bittersweet or milkweed pods look like, or what I mean by “frothy spray type stuff, pods and plants that have texture,” when given an example or two he always rises to the challenge and is a great searcher.  In fact, I  am quickly in awe of his ability to spot a particular type of berry or plant waaayyy before I do and in no time at all we have a beautiful collection of plant materials to work with.  This was actually a very nice way to spend the afternoon together on a beautiful Fall day.

 Some of the materials we collected
(Please be reminded that it is important not to collect materials from privately owned property unless you have secured permission.)

Note: bring clippers, gloves and paper bags.  Also, collect more than you think you will need because some will get crushed in transit and some may not be “right” for the arrangement.


You will want to spray the more delicate pieces with ozone-friendly hairspray or some other fixative (outdoors if possible) to discourage any disintegration.


I wove bittersweet vines in and around the grapevine base, using a glue gun to secure them as needed (I sometimes adhered leaves or loose berries to exposed glue to cover it).


I randomly placed the rest of my materials through trial and error in a way that pleased me – alternately moving a piece around until it looked “right” and gluing it in place (make sure you like where you have it before you glue it).


I made pine cone “flowers” that I arranged here and there:
 

Here's how I made the pine cone flowers:


I snipped sections from the pine cone using my pruning shears.


I was able to make several flowers from each pine cone.


This is a close-up of one section.


Finally, I attached an old bird’s nest that I salvaged from a bush in my yard.  I knew the nest was no longer in use and had been abandoned (never remove a nest from the wild that may still be inhabited or is in the process of being made). I also added a bird that I purchased from my local craft store.


And here is my completed wreath!


I encourage you to give this project a try, materials are prevalent right now and best of all, free! It is a beautiful season to forage for elements to use and rambling around the outdoors with your spouse, child, best friend, what-have-you is a great way to spend time together. 

Little end note: If you are interested in visiting the Hill-stead Museum during any other part of the year you might be interested in reserving our library’s Museum Pass which is provided by the Friends of the Avon Free Public Library.

Friday, October 15, 2010

FALL IS HERE - AND WITH IT COMES HALLOWEEN

I admit it.  I had trouble coming up with a project for this posting.  The material for the last two posts practically fell into my lap when, almost simultaneously, my colleague asked for sewing advice and I discovered that September was National Sewing Month.  The project was also a no-brainer - since she cooks I decided to sew an apron and tried to cover the various steps involved in creating a finished craft project. This time around however, I had a subject but no idea of a what or a how. Oh no! I was stuck at  my own instruction: "Step One - decide what to make." This was a new concept for me!! I usually have a "how" at least (...and these days it is usually knitting) so, I ask myself, what is the process of coming up with an idea (out of the blue) in the first place? 

I started with what I knew - my subject - I wanted to recognize the onset of Autumn.  So I went to our library shelves to explore the possibilities for Fall crafts.  I quickly discovered a couple things.

First off, after getting over the shock of not finding many on our shelves I found that our, ever so on the ball reference staff had set up a special display that celebrates Fall.  Much relief!!!!!


Secondly,  while there are numerous books dedicated to Christmas decor and crafts there are far fewer that cover Fall, and many of those seem to be specifically Halloween or Thanksgiving oriented. You can find many books and magazines that concentrate on costumes, pumpkin carving or food.  I am not going to do that...except to share with you one of my father's pumpkin creations.  My dad doesn't tend to go into all that fancy carving that you see these days yet, somehow, I prefer the zany characters he creates. They always tickle my fancy. Here is one from a year past.


I didn't want to do just turkey or ghost and spider projects.  Also, because I had just finished a sewing project, I didn't want to use sewing as the method this time around (although I did find some really cute Halloween and Autumn themed fabrics...hmmmm).  This is not so easy when you can't start by looking up a specific craft and then figure out what to make following instructions for it.  A Craftster's mind almost never stops thinking or envisioning possibilities, except when it comes to a deadline.  Then it can all go dry.  I was really wracking my brain - did I want to use clay, papier-mache, paints?  A project for Halloween , Thanksgiving, or just Fall in general?

Since Halloween is fast approaching and you may be up a creek regarding ideas for little Halloween projects, I have decided to post some relatively quick and easy Halloween projects for now. In a few days I will continue with my Fall themed projects.

Here is a group shot of some of the things I created for this blog


Some of the crafts I discuss here were inspired by projects found in various Halloween books we own at our library, while others are either from my head or from free projects sheets I found at our local Michaels store.  When trying to come up with quick and easy projects your local craft store is a great place to explore.  Not only are there often free project sheets, there are so many types of products available that allow you to create any of the projects you've seen in the Halloween books in many different ways.  That's the fun of crafting - nothing is finite.  Use whatever you have, experiment, and enjoy yourself.


Egg Carton Spiders - when my kids were little I would hang these from our chandelier.  They are very simple to make.  Cut the cups out from a cardboard egg carton - poke a small hole in the top (for hanging thread if you intend to hand them up) and 4 holes on both sides (for the legs).  Paint the cup black inside and out. Attach thread at the top.  Cut 4 lengths of black pipe cleaners for the legs: push a piece from the outside to inside of one leg hole on one side of body then through the other side of body from inside to outside - one piece becomes 2 legs.  Repeat with the rest of the pieces and bend to shape.  (If preferred, cut 8 smaller pieces and affix individually - glue in place from underneath.) Glue googly eyes to front.


Creepy Crawler from Styrofoam ball -  Use toothpicks or craft stick to connect two balls for a head and body.  Cover with craft clue and small pieces of tissue paper.  Once dry, paint it black.  Cut four pipe cleaners in half for legs and insert 4 legs into each side of the body.  Thread 1 bead for each eye onto a large head straight pin and press into the spider.


Glue gun Spider Web - Every spider needs a web to crawl on.  This one is amazingly simple.  When I peeled mine off of the parchment paper I felt a sense of wonder at how easy, yet effective this project was.  To create: Using a glue gun, "draw" an L shape, with both sides the same length, onto parchment paper or non-stick baking sheet.  Starting at corner, draw a series of lines, the same length as first lines, radiating outward (the creates the spokes of the web).  "Draw" scalloped lines across these to make spiderweb.  Make sure all the rows are touching.  Let dry, then peel off.


Polymer Clay ghosts, pumpkins etc. - Polymer clay (such as Sculpey brand) is a soft clay that is moldable until baked in an oven.  I used white clay and then painted it because that is what I had on hand, but you can purchase this clay in a wide variety of colors to create pieces that do not need to be painted.  To create these pieces simply push and pinch the clay into the desired shape.  I used the side of a toothpick to create the indents separating the pumpkins sections.  If you want to hang the item like an ornament, insert a small hook or curved section of wire prior to baking.  I used wire cutters and snipped off the small section of a paper clip for mine.  I also used pearlized paint on a couple of the ghosts.


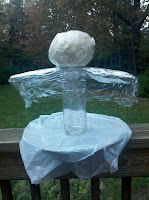
Sheer Stand-up Ghost (or you could attach invisible thread and hang it up) -  I have seen this ghost made with cheese cloth.  I had some old sheer fabric leftover from something else and I thought this would be a good way to recycle it.  This was very simple!  Find items to use as a support - I used a tall vase, added foil "arms" because I wanted the "arms" to stick out (if you don't, just don't) and a giant ball of masking tape for the "head" (you could use a bowl - I just happened to have, oddly enough, a giant ball of masking tape that was left over from when I painted a room.  One of my sons, who has a great sense of humor, thought it would make a great pen holder and stabbed a number of ball point pens into it, quietly leaving it for me to discover.  I thought it was a riot and have kept it - great recycling and actually, a great pen holder!).

That's my form on the right with the giant masking tape ball.  Note: Cover the objects with plastic wrap so they don't get ruined and so the completed project doesn't stick to them. Also, place the assemblage onto a waterproof surface that you can move or where it can sit while it drys. Coat the fabric with fabric stiffener following the directions on the bottle (you can find this at your local craft store) and drape it over the form you have created, arranging it however it pleases you.  Allow it to dry; remove it from the form; if desired, paint black eyes and mouth on it. 


Styrofoam Eyeballs - Here's looking at you kid!  I painted small balls of Styrofoam with white acrylic paint hoping it would give the eyes a uniform look all around, I then painted the iris, followed by the pupil. I finished up by drawing in the veins using a fine red marker.  Note: Styrofoam is very porous and is not easy to paint. "Pouncing" the paint on rather than brushing works better. Coating it with glue and tissue, as with the spider, might have been a good idea...but I wanted to do something different here, and the eyes are fairly small so it wasn't really a big deal.  If you are tackling a bigger project you might do something different (as I did for my next project.)


Styrofoam Candy Corn Cones - There was no way I was going to play around painting the cones, I would have been there forever!!  And I didn't want to do the tissue and glue thing again, although it would have worked fine.  I decided to try a product I bought a long time ago because it seemed neat and I just never got around to trying it.  This blogging thing is continuously getting me to try new stuff!  The product is called plaster cloth and it a 4" wide strip of cloth that is pre-plastered.  To use it, cut it into lengths you want, dip it in water and shape it onto the form you want to cover.  Pretty much like papier-mache except the strips are pre-treated.  I covered two different sized foam cones using this product and set it to dry.  Once dried, I painted them to resemble candy corn.  Pretty neat!  Note: I wanted mine to have a rustic look to them so I didn't mind the ridges left by the plaster cloth.  If you want a smooth, more candy-like, finish you could coat the cone with air dry molding clay before you paint it.

Let me interject here: whatever you do, when you are gluing tissue paper onto something, or using plaster cloth, DO NOT ANSWER THE PHONE.  My next blog may well be titled, "Decoupage your phone - What a great idea!"


Candy Corn Earrings - Paint purchased unfinished wood shapes and paint them to look like candy corns.  Glue pierced earring posts to back. Ta da!


That is all I have for you this Halloween season. I hope you feel inspired. Flip through some books or magazines.  Go to your craft store.  Let your mind ponder the possibilities.  If you have any questions about these crafts please feel free to email me (the address is in the About Me section).  I'd love to hear from you!  Comments are also welcome - just click on "comment" below.

Some of the books I utilized for this post were as follows (as always, clicking on the titles will link you directly to our catalogue):

Halloween Celebrations 2 separate books from the Woman's Day Special Interest Publications series:


vol. XVII, 2007 - inspired my polymer clay ghosts, pumpkins and witches hats


vol. XVIII, 2008 - inspired my glue gun spider web


 Gooseberry Patch Halloween, 2010 - inspired my Styrofoam spiders

Friday, October 1, 2010

A PATTERN IS LIKE A RECIPE

When you last heard from me I was heading off to our library shelves to research an idea I had for an easy starter sewing project for our resident cooking blogger, Julie (641.5 with Julie). As I researched and then executed this project I came to recognize similarities in our crafts: a pattern is much like a recipe! Both involve a collection of items, a series of steps and, if you follow the steps, a product to be proud of (or, in some cases, at least learn from...). If you read my last post you may recall that sewing is not my favorite craft in the world but I do like to cook.  This was therefore, a tremendously helpful epiphany.  Having said all that, here is my recipe for completing a sewn project from scratch.


My sewing machine.  Had it since I was a kid.  Hardly ever used. 
 I'm not sure the stitch selection wheel has ever been changed.
Here goes nothing!


Step One: Decide what you want to make.  This part was a no-brainer.  I decided that an apron would be a relatively easy item to execute and something that Julie might actually use.  It could also be a quick gift to make over a weekend for one of my cooking friends.

Step Two:  Locate a pattern.  Once I realized that I was going to have to produce this sewing project myself (egads!) I set out to find the simplest, most basic pattern possible. This is kind of like looking through cookbooks to find a recipe that suits you.

My initial search led me to 3 books that were not currently checked out. (Clicking on the titles will link you to our card catalogue should you want to place one on hold for yourself).


Seams to Me by Anna Maria Horner
The "Part 1 - Getting Started" section has good coverage of sewing tools and how to use them; the choices of fabrics and how to decide what you need; the how-to descriptions of basic stitches and the techniques one might encounter.
The "Part 2 - Projects" section includes an apron.


Weekend Sewing by Heather Ross
I figured anything that was labeled "weekend" had to be fairly manageable.  Indeed, her pattern for a tie around the waist style apron looked like it would be quick and easy.  It was a definite contender.


Martha Stewart's Encyclopedia of Sewing and Fabric Crafts by Martha Stewart
Even though this title was included in my last posting I thought I would revisit it with more of an in-depth look at how workable her projects are.  She has several apron options to choose from, some as simple as sewing two tea towels together.  I don't think I can get away with that here!


In the end I chose an apron pattern from Martha Stewart's book because it was a full length/chef style apron.  When I cook I get flour all over the place and frequently wash my hands that I dry on my apron.  A pretty, little half apron just doesn't cut it in my kitchen (I can't say what happens in Julie's kitchen...)!

Step Three:  Read the pattern instructions (and in my family, read it at least 3 more times because we're funny that way).  This is so you have a clear understanding of what the steps are and what you will need to purchase.

Step Four:  Shop!! Buy fabric and notions.  (Apparently "notions" doesn't just mean "ideas/whims" it also means "small useful items/sundries". One can have a notion to shop for notions!). At any rate, the pattern lists what you will need to complete the project.  This is probably my favorite step. But it can be daunting as well - so many choices, all ohhhh so pretty!  This is why many crafters often end up with vast "stashes" of fabric/yarns/flosses/patterns, etc. 

The pattern I chose suggested a medium weight fabric such as linen, cotton, denim.  Martha chose linen. Hmmm. I opted for durable denim because it can take lots of abuse (see above note about my cooking style).

You can learn a lot from the label on the end of the fabric bolt - including washing instructions.  It's a good idea to read this as I almost chose a fabric that said "dry clean only" - NOT very appropriate for an apron to say the least!  There is nothing on the label, however, that says "medium weight". Given Martha's examples I looked for denim type weights or something akin to a table cloth.  I steered away from the pretty quilt fabrics which are not medium weight.  When in doubt ask a store employee.


I had no idea there were so many denims to choose from. This display continued on the other side as well!


My notions have been collected and I am ready to go.

Step Five:  Prepare materials.  This is when a cook would start trimming the meat or washing the veggies.  A little less messy for a seamstress.

In the pattern I have chosen, Martha first recommends that you wash the fabric.  Why, I ask?  It looks pretty good to me.  I turn to her section "Preparing Fabric for Sewing" where she explains that washing "will prevent your finished project from shrinking in the wash after it's sewn and prevent puckering along seam lines."  Not necessarily a vital problem for my apron but probably a good habit to get used to (not that I intend to do a lot more machine sewing...) Since I am committed to this project I might as well do it right.  Who wants to cook in an apron with puckered seams after all? This same section of her book also instructs that you:

  • Press the fabric so the wrinkles don't "distort the fabric enough to throw off the sizes and shapes when it comes time to sew"

  • Find the grain (more kinship to cooking!) because the "grain of the woven fabrics influence both the drape and durability of a finished project

  • Determine the "right and wrong sides of fabric." Always a good idea. Guess you can't just flip it inside out... 
That Martha Stewart is thorough!!

Speaking of thorough, this book includes a CD with all the pattern templates on it, which is nice. But I decided not to print the template. The diagrams in the book show all the measurements I needed (famous last words).


My pieces all cut out.
I decided not to include a pocket and opted for it to be
shorter and slightly more narrow.

Note: remember when you are cutting out the 2 ties that the fabric is folded, ie. doubled. You only need to mark and cut each once. I almost ended up with 4 waist and 4 neck ties.

Step Six:  Create.  This is the time of truth.  The pieces are cut, there is no going back.  Commitment.  Deep sigh.   It is at this point that the cooking and sewing processes divide a little. Many cooks I know sip a little wine while they create.  Vast amounts of coffee however appears to accompany the creative process of most of the seamstresses I know. Hmmmm, again.

I look at the pieces, at The Machine and then to the pattern where I read (yes again but somehow it only enters my awareness now) that I can still avoid The Machine for a little bit because the next instruction requires ironing.  Now, to be honest here, what I feel towards ironing is akin to how I feel about machine sewing but I am at least a little more familiar with it.  So, off I run, pieces in hand, to the ironing board.  While the iron heats to the proper temperature for my fabric I read on (mm hmm, again - if I procrastinate long enough maybe the project will magically complete itself!).  I see why this instruction hadn't impinged itself on my awareness before:  Martha instructs "Sew double hems" but then follows it with an explanation of how to create a double hem (which requires folding in and pressing, then folding over and pressing again).


Martha's directions are complete and all terms that are unexplained within the pattern are easy to find in the other sections of her book when/if necessary - such as I did with "Preparing the fabric", or now, "edge-stitching" the double hem.  What?!


Edge-stitching means sewing very close to the inner edge of the hem.


My completed edge-stitch is a thing of beauty that I pause to admire.  I must admit there is a certain level of pride in this small accomplishment.


I can't be too smug however, because I did discover that you need to do this at a relatively slow and steady pace.  If you get too cocky and go too fast you just might go off the edge. 


My neck and waist ties all ironed and ready to edge-stitch.


All that is left to do is to attach the ties as instructed, using a "boxstitch" which is a fancy name for stitching what is essentially a square around the edges to secure the pieces together.  A figure to the side of the page depicts the step well.


My completed boxstitch.


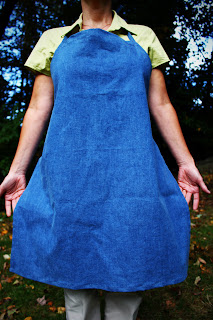
Ta Da!!! Project Apron complete!!


This wasn't so bad after all!  I even made some changes to the pattern (shorter, narrower, no pocket) and came out the other end with a viable product.  Not too shabby.  If you choose to do this as well, take note: you will need to buy less fabric - I ended up with a whole extra yard left over.  Another thought: for today's "green" movement recycle an old tablecloth instead of purchasing fabric.

I don't know if my apron would pass Martha Stewart's inspection but my seamstress friends showed appreciation as they inspected it and that works for me.  (A completed recipe would certainly taste better at this point but now I am prepared to cook anyway.  Guess I can put the coffee cup away and pick up the wine glass. Maybe I will try one of Julie's recipes.)

If I can do this, so can you.  Work the steps and let me know how you did.  Best wishes for happy sewing, The Crafty Librarian.